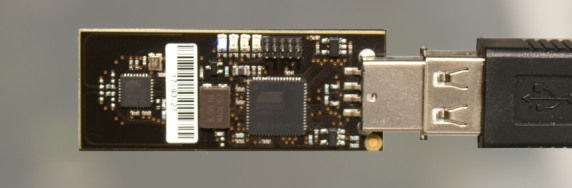
RZRAVEN USB Stick (Jackdaw)
[Contiki platforms]
Modules | |
| USB Configuration | |
| USB Contiki Task | |
| USB Driver | |
| RNDIS Support | |
| USB Mass Storage Task | |
| CDC Task | |
| 6LowPan Ethernet Interop | |
Detailed Description
Introduction
This document explains the Raven USB Stick when operated on an IPv6 network. The USB Stick allows the computer, and outside networks, to communicate with low-cost embedded nodes. The "RZUSBSTICK" hardware, when loaded with the Contiki "ravenusbstick" example, forms the complete device described here. This combination of hardware and firmware is henceforth referred to as the "Jackdaw".
Capabilities
The Jackdaw supports multiple operating systems, customizing itself to OSes as needed. The overall idea for a network interface is to emulate an ethernet interface. Data is passed to the Jackdaw as if it was an ethernet port, however the Jackdaw passes this data over the air to end nodes.
The Jackdaw can function as an 802.15.4 sniffer, and can sniff the raw 802.15.4 frame at the same time it is providing network functionality.
In addition to the network interface, the Jackdaw can enumerate a USB serial port at the same time. This serial port can be used to pass debug messages, or to change operating parameters as needed. Note that WindowsXP SP2 or lower does not support this, the serial port will only be enumerated on Linux or WindowsXP SP3. Windows Vista should work with minor modification to the INF files.
Finally the Jackdaw has the ability to show up as a USB mass storage drive. This is used to load drivers onto a PC without needing any other hardware, such as a driver disk. The amount of storage is very limited at around 59 Kbyte, sufficent for a few driver files.
Plugging It In
When plugging the Jackdaw in, several things occur in sequence:
- Attempt to appear as a network interface with a serial port. If this fails (drivers don't load), it then unmounts itself and waits a few seconds.
- Attempt to appear as just a network interface. If this fails as well, it again unmounts itself.
- Finally mounts as a mass storage device
If the device has never before been plugged in, you will end up with an unformatted USB mass storage device. You can format this as you would a normal drive - on Windows right click and select "format". If the device has previously been formatted, or was programmed from a preformatted flash image, you will end up with a new drive which contains the drivers needed to have the device work on Windows.
Loading Drivers
Windows should prompt you for drivers for the device. Simply point it to location "C:\contikisrc\cpu\avr\dev\usb\INF" Where the directory "c:\contikisrc" is where the Contiki source code is on your computer.
If you have a Jackdaw with a formatted mass storage section, with the drivers on it, you can simply wait until that drive shows up. Then point the Windows "new hardware found" Wizard to this new drive, which should have three .INF files in it.
Setting Up
Linux
The Jackdaw has excellent support in Linux. The first thing to check is that it was detected. Plug it in, and check the output of 'dmesg'. You should see something like:
usb 5-2: new full speed USB device using uhci_hcd and address 29
usb 5-2: configuration #1 chosen from 1 choice
rndis_host 5-2:1.0: dev can't take 1338 byte packets (max 1338), adjusting MTU to 1280
usb0: register 'rndis_host' at usb-0000:00:1d.3-2, RNDIS device, 02:12:13:14:15:16
cdc_acm 5-2:1.2: ttyACM0: USB ACM device
usb 5-2: New USB device found, idVendor=03eb, idProduct=2021
usb 5-2: New USB device strings: Mfr=1, Product=2, SerialNumber=3
usb 5-2: Product: RZRAVEN USB DEMO
usb 5-2: Manufacturer: Atmel
usb 5-2: SerialNumber: 1.0.0
You can then check that it was assigned a link-local address. Run 'ifconfig' and observe the output, looking for the line about usb0:
usb0      Link encap:Ethernet  HWaddr 02:12:13:14:15:16
          inet6 addr: fe80::12:13ff:fe14:1516/64 Scope:Link
          UP BROADCAST RUNNING MULTICAST  MTU:1280  Metric:1
          RX packets:131 errors:131 dropped:0 overruns:0 frame:131
          TX packets:169 errors:0 dropped:0 overruns:0 carrier:0
          collisions:0 txqueuelen:1000
          RX bytes:30429 (29.7 KiB)  TX bytes:28290 (27.6 KiB)
The address that starts with "fe80" is the link-local address. If this wasn't automatically assigned, you can assign one as such:
ip -6 address add fe80::12:13ff:fe14:1516/64 scope link dev usb0
If you wish to see how to generate router advertisements in Linux see the Running Contiki with uIPv6 and SICSlowpan support on Atmel RAVEN hardware .
You will also notice the line mentioning ttyACM0, that is the 'debug' interface. You can connect any terminal emulator to it such as gtkterm. Simply set the port to "dev/ttyACM0". See the Debug Port Useage section for more information.
XP
Once the drivers are installed, you should see the device show up in "Network Connections". You should see something like this:
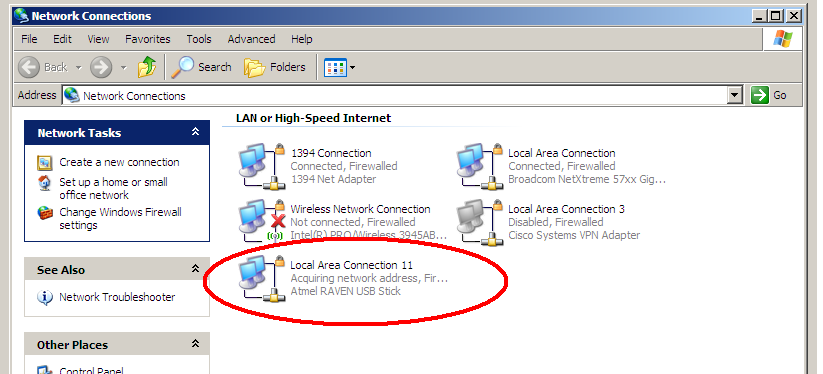
Right-click on this, and hit "Properties".
Click the "Install" button. Select "Protocol" as the type of network component, and hit "Add". The manufacture is "Microsoft" and the network protocol is "TCP/IP version 6". Hit OK.
Then in the window "This connection uses the following items:", uncheck everything EXCEPT "Microsoft TCP/IP version 6". Hit OK and get out of that dialog. We can no longer do anything graphically, as WindowsXP doesn't have support for IPv6 through anything but the command-line interface.
If you wish to see how to configure Windows to generate router advertisements, see the Running Contiki with uIPv6 and SICSlowpan support on Atmel RAVEN hardware.
You may additionally see a debug port enumerate. This will show up as a serial port, which can be checked by going to the Device Manager and seeing if an "Atmel Raven USB Debug Port" shows up under "Ports (COM & LPT)". If so, you can connect a terminal emulator such to this port. A simple one that is recommended is "Br@y++ Terminal".
Debug Port Useage
The Jackdaw enumerates a CDC serial port. This is typically used by USB<-->Serial converters, however in this case it simply emulates a serial port. Since there is no physical serial port, the setting of the baud rate does not matter.
The Jackdaw sends both a LF and CR after every line, so you should disable any terminal emulator options that add extra CR's.
With the port connected, strike the 'h' key to bring up the main menu. It should look something like this:
********** Jackdaw Menu ******************
*                                        *
* Main Menu:                             *
*  h,?             Print this menu       *
*  m               Print current mode    *
*  s               Set to sniffer mode   *
*  n               Set to network mode   *
*  6               Toggle 6lowpan        *
*  r               Toggle raw mode       *
*  u               Switch to mass-storage*
*                                        *
* Make selection at any time by pressing *
* your choice on keyboard.               *
******************************************
Network mode
Network mode is the default mode. In this mode addresses inside IP packets will be adjusted to reflect the network they are on. For instance inside a Router Advertisement message, the link-layer address on the ethernet side will be 6 bytes. On the 802.15.4 side it will be 8 bytes. This allows both systems to accept this IP packet as valid.
Sniffer mode
In sniffer mode, the IP packets themselves are left unchanged. This means that you won't be able to form a network, as the computer's IP stack will not understand why the link-layer addresses are 8 bytes. It is only expecting 6 bytes, as it is assuming an ethernet layer.
6lowpan enabled/disabled
Enabling or Disabling 6lowpan changes if the USBStick will decode 6lowpan messages into valid IPv6 messages and send them over the ethernet interface. Enabled by default.
raw mode enabled/disabled
If raw mode is enabled, every 802.15.4 frame that comes in will be sent to the computer raw. It will be sent as an ethernet frame, with the ETHTYPE set to 0x809A. Note this is not an IEEE standard, so to use this device as a 802.15.4 sniffer needs some extra work, described in the Using Wireshark section. Also for every 802.15.4 packet that is sent out over the RF port is sent out over ethernet as well.
Mass Storage
This will switch the device to Mass Storage Mode
Using Wireshark
When using the Jackdow with 6lowpan, you can simply operate Wireshark as normal. Select the interface as the USB Stick, on Linux this will likely be "usb0", and on Windows it will just call the interface "Atmel". You will see pure IPv6 packets, with traffic such as ICMPv6, TCP, or UDP.
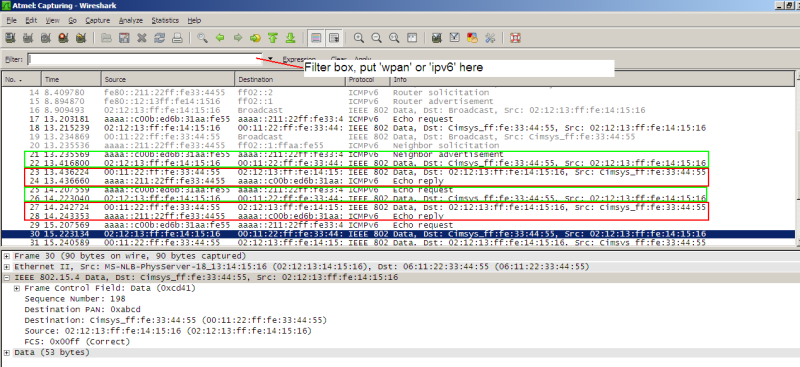
If you have raw mode enabled (it is by default), you will also see 802.15.4 information. You may see many 802.15.4 packets for one IP packet due to fragmentation. You can also put either 'ipv6' or 'wpan' in the filter box at the top of Wireshark to filter out everything but IPv6 or 802.15.4 traffic. Also, for received frames the 802.15.4 data will come BEFORE the IPv6 packet. For transmitted frames, the 802.15.4 data will come AFTER the IPv6 packet. You can see that in the following, where messages from the same source are boxed:
Note that Wireshark does have support for 802.15.4, but you need version 1.1.2 or later. See Wireshark download for download instructions.
- Note:
- 802.15.4 packets transmitted from the Jackdaw will come up as having "Bad FCS". This is because the FCS is added automatically by the radio chip, and is not known to the microcontroller on the Jackdaw. Hence some padding bytes are added to allow you to see where the FCS would go. The 802.15.4 packet was generated from the IPv6 packet directly. The only way to actually sniff the real over the air data is to use a second Jackdaw as just a sniffer.
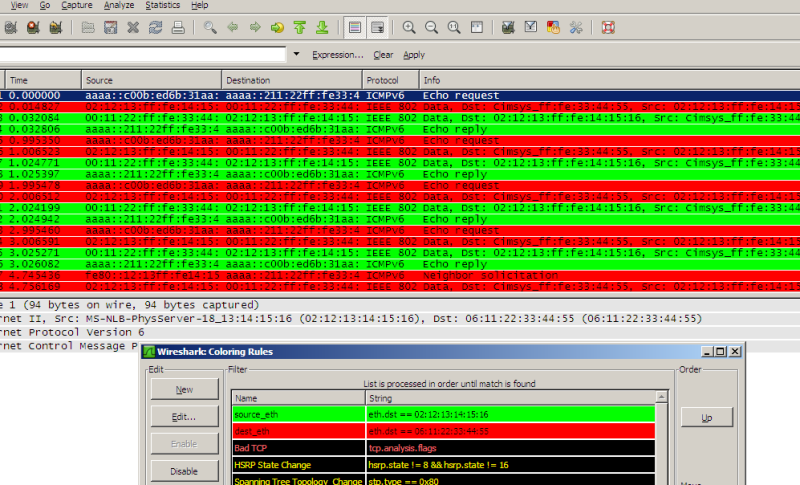
Also be sure to use the features of wireshark to make life easier! You can colorize packets based on various things, including destination and source addresses. The following example colourizes packets destined for different addresses differently, quickly letting you see message flow. You could furthur colorize based on the message type, to allow you to see 802.15.4 packets and IPv6 packets in different colors. The following example has the 'source_eth' and 'dest_eth' rules at the top of the order, you may want to put them lower so you still see other colourizations such as bad TCP, checksum errors, etc.
Mass Storage Mode
The mass storage mode provides a small amount of storage by using part of the internal flash of the AVR. This will get erased every time the AVR is reprogrammed.
The Jackdaw can end in mass storage mode in three ways. It can fail all other modes and end up there, it can be forced there through the debug port, or it can be forced there through a hardware switch. see the Forcing Jackdaw to certain Modes section.
Once in mass storage mode, you will have to format the device. This can be done by right-clicking on it and hitting format, or if you attempt to open the drive Windows will ask you to format it. Once it is formatted you can store a few INF files on it! If you read the FLASH back from the AVR, you now have an image with a preformatted drive with those INF files on it already!
Forcing Jackdaw to certain Modes
The Jackdaw has several operating modes, and very limited inputs to switch between them. Hence it auto-switches to what it feels is the most useful mode, but it's not always right. Hence an override is provided to allow you to use it in other modes.
This override is to short two pads on the back of the Jackdaw. Note that only a somewhat conductive short is needed, a moist finger should be plenty of conductivity. The pads to short are visible below the"A" in the "ATMEL" logo. There will be three pads - only short the two closest to the "ATMEL" logo. Or as below:
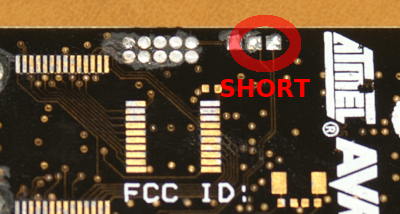
Short them when plugging in the Jackdaw, and it enters "reverse logic mode". If it doesn't, you either might have not enough conductivity, or you might be shorting to the third pad too much.
In "reverse logic mode" it will stay in the main mode (Network interface + Serial debug port) if it doesn't see the driver loading on the host computer. This mode is needed for Windows Vista, where you have to keep the hardware plugged in while installing drivers.
If the driver DOES load OK, it will remount itself as a mass storage device. The idea is that you can hold the Jackdaw a specific way when plugging in and it will mount as mass storage. Note that it will FIRST mount as a network interface for a few seconds before switching.
One problem with this is Windows XP SP2: it will never exit the first (network + debug) mode, and you don't have a debug port to switch to mass storage mode. You can either upgrade to SP3, or uncomment this line in platforms\ravenusbstick\contiki-raven-default-init-lowlevel.c:
#define WINXPSP2
Translation
Addresses on the 802.15.4 network are 8 bytes long, and addresses on an ethernet network are 6 bytes long. This provides some problems for bridging the two networks. This should be done by routing the IP packets between the ethernet and 802.15.4 network, but the current code does not have support for routing.
As a temporary solution, addresses are "translated" when passing through the Jackdaw. This generates valid ethernet addresses from the 802.15.4 addresses, and valid 802.15.4 addresses from ethernet addresses. Note this also includes translating addresses which are inside IP packets. Certain messages, such as various neighbor discovery messages, include a link-layer address. An IP stack which is expecting an ethernet-sized address will get confused by the different size, and vis-versa.
Details of the translation can be found in the 6LowPan Ethernet Interop documentation. It is important to remember this is a temporary solution until proper routing is implemented.
Annex
Wireshark download
- Check the latest stable release at http://www.wireshark.org/ - it may already be revision 1.1.2 or later.
- You can apply a patch to Wireshark sources earlier than 1.1.2 and rebuild it yourself, see https://bugs.wireshark.org/bugzilla/show_bug.cgi?id=2938
- You can download the latest sources or prebuild binary from http://www.wireshark.org/download/automated/ - be sure to get SVN revision 26352 or later. For win32 there are three types of binaries, the "normal" installer will have a name like "wireshark-win32-1.1.2-SVN-26354.exe".
- You can download a prebuilt version of Wireshark 1.0.3 at http://www.newae.com/download/wireshark-setup-1.0.3-jackdaw.exe
- Note:
- For some reason the author list is crazy, i'm not sure how to stop this! It should follow this text...